Making your own Easter eggs is a fun way to celebrate Easter. You can decorate
your eggs as simple or fancy as you want! Create a tradition by decorating eggs
every year. Before you can decorate the eggs, you need to get the inside of the
egg out, without breaking the shell! It's really quite simple to do. How? You
blow the egg out.
Gather together these things:
eggs
a needle
a bowl
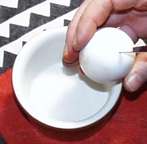
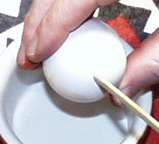
Using the needle, poke a small hole in the narrow end of the egg, and a slightly
larger hole in the other end. Move the pin around to make sure you tear the
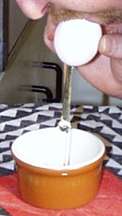
membrane around the yolk. Now, holding the egg over the bowl, blow through the
small hole. The egg will be forced out the larger hole and into the bowl. Make
sure you rinse the egg well with water.
"When drying eggs, use bleach container lids - they are just the right size
and don't make a ring around the bottom of the egg."
Oh! What to do with the egg-innards? If it
is for yourself, you can make the eggs into a nice omelet or quiche. If doing
this with a class, you might not want to use the eggs for reasons of health
regulations. Your eggs are now ready to decorate. Let your imagination run wild!
You can use any of these things to decorate your eggs:
paints
ribbons
sequins
glitter
lace
colored foil
felt tip pens
fabric scraps
tassels
dye kit
Use candles to drip wax onto eggs. When the wax sets, dip the egg into some dye.
Take the egg out and let it drain. You can either peel the wax off or you can
drip some more on and dip it in a different colour. Just another hint - use the
lighter colours first. When you have finished, carefully peel off the wax.
Don't forget any supplies you may need, such as paint brushes, water, glue, and
scissors. If you don't want to use real eggs, you may be able to find egg shapes
made out of styrofoam, papier mache, or wood at your favorite arts and crafts
store.
Egg
Moulds
Bring on the Chocolate Traditional Moulds - These days it is fairly easy to find
Easter egg moulds and other Easter related moulds. Just melt the chocolate and
pour it in. The easiest way is to make a solid egg by filling the two halves,
setting them and then using a thin spread of melted chocolate to
"glue" them together. The more economic way is to coat the inside of
the shell with chocolate and to make a hollow egg, joining the two halves the
same way.
Let's Get Messy Again - Grab those hollow eggs from the section above, make one
of the holes a little bigger, and pour (maybe trickle would be more apt?) the
chocolate through the holes. Either pour in a little and move the egg around so
it spreads around the sides, or pour in a lot and fill the egg. After the
chocolate sets, gently peel the eggshell from the egg.
Swirled Eggs
You will need:
An adult to help on some steps.
Dry, hard-boiled eggs (with no cracks) at room temperature.
Food coloring
White Vinegar
Construction paper, scissors, and stapler
Rubber cement (do not use the type called one-coat rubber cement, it is too
sticky)
Disposable cups
Popsicle stick
Spoons
Paper towel
Step 1
With an adult's help, make homemade egg dye. Mix 1/2 cup boiling water, 30
to 40 drops of food coloring, and 1 teaspoon of white vinegar. Let the dye cool
completely before using it.
Step 2
Cover the table with newspapers. Pour about 1/2 cup of rubber cement into
another cup. Be sure to wash your hands thoroughly with soap before you touch
the eggs. If the eggs get dirty, they won't dye evenly.
Step 3
Cut a strip of construction paper and staple it into a circle. This will make a
stand for the egg. Set the egg on top. Dip a popsicle stick into the rubber
cement and dribble it onto the egg. Let it dry for about 15 minutes, then turn
it over and dribble the bottom.
Step 4
With a spoon, place the egg into the dye, and you'll start to see your
patterns. Leave the egg in the dye until it's the color you want.
Step 5
Remove the egg from the dye with the spoon. Gently pat the egg with a paper
towel Let it dry for about 30 minutes.
Step 6
Rub the rubber cement with your fingers. It will come right off, leaving
pretty squiggly designs. Don't eat these special eggs, they are for decoration
only.
Easy
Batik Eggs
Batik
is an Indonesian method of hand-printing cloth by brushing
melted wax on to the parts that are not to be dyed. The
traditional method of making Batik eggs also uses melted wax
alternating dipping the eggs in colored dyes and adding designs
by painting on melted wax. This method uses masking tape to
produce very interesting results.
Cut
out designs from masking tape and stick them onto your egg. Dip
the eggs into dye. When they are dry remove the masking tape.
You can repeat the process by sticking on new cutouts and
re-dipping the egg. You can overlap some of the colors for
variety. Be sure to start with the lightest dye and work your
way to the darker ones. If you want to keep an area a particular
color, cover it with masking tape.
You
can use a white crayon (actually any color you want) or hard
paraffin wax to draw on designs which will resist the dye.
Ukranian Easter Eggs
Simple, beautiful pysanky or Ukranian Easter Eggs are within the reach of any
beginner! These elegant eggs make great gifts for family and friends. You will
need: ·
Smooth, fresh eggs at room temperature ·
Writing tools (straight pins stuck into a dowel, cork, or pencil eraser) ·Wax
(equal amounts beeswax and paraffin) ·
Wax warmer (candle heated container) ·
Egg dyes (prepared according to package instructions in containers large enough
to submerge eggs)
Paper tissues or soft absorbent cloth
Step 1
Prepare the eggs by "blowing" your eggs before painting. Use a long
pin to make a tiny hole at each end; the hole should be a bit larger at the
bottom. Pierce and break the yolk with the long pin. Shake to mix the inner
contents. Over a bowl or sink, blow through the smaller hole to force the
contents out of the larger opening. Rinse the shell and prop on an egg carton to
dry.
Step 2
Create the design. First practice your design on paper before applying wax to
the egg.
Step 3
Melt the wax. Working quickly to prevent the wax from hardening, dip the
pinhead into melted wax and touch it to the egg to create your design. The
pinhead touched to the egg will form a small dot. To make a tear drop shape,
draw the pinhead along the surface of the egg. These two shapes may be used in
different combinations to make a variety of designs.
Step 4
One to three colors are usually used for each egg. Always progress from the
lightest to the darkest dye color. When the complete wax design has been
applied, place the egg in the first dye solution several times until desired
color is reached (10-30 minutes). The longer the egg remains in the dye, the
deeper the color will be. Remove the egg and blot dry with tissue or cloth. Once
the egg is dry, add additional wax designs and repeat color process with darker
dye.
Step 5
To finish, after the final dye bath, remove the wax by holding the egg, a small
section at a time, against the side of the candle flame for no more than five
seconds. As soon as the section appears wet, blot with a clean, soft cloth.
Continue until all the wax is removed. do not hold the egg over the tip of
flame, as carbon will collect and darken your design.
Step 6
Eggs may be preserved with varnish. Use a clear type of varnish and 2 or 3
light coats.
Dying Easter
Eggs - The Natural way!
This Easter, why not color your eggs using nature's very own dyes? It's possible
to come up with a great number of colors using natural ingredients that can
easily be found in almost any kitchen.
Pale Red: Fresh beets or cranberries, frozen raspberries
Orange: Yellow onion skins
Light yellow: Orange or lemon peels, carrot tops, celery seed or ground
cumin
Yellow: Ground turmeric
Pale green: Spinach leaves
Green-gold: Yellow Delicious apple peels
Blue: Canned blueberries or red cabbage leaves
Beige to brown: Strong brewed coffee
To dye the perfect Easter eggs the natural way, here's what to do:
1. Put eggs in a single layer in a pan. Pour water in pan until the eggs are
covered.
2. Add about a teaspoon of vinegar.
3. Add the natural dye appropriate to the color you want your eggs to be.
(The more eggs you are dying at a time, the more dye you will need to use.)
4. Bring water to a boil, then reduce heat and simmer for 15 minutes.
5. Remove the substance you used to color the eggs. Put eggs in a bowl.
If you want your eggs to be a darker shade, cover them with the dye and let them
stand overnight in the refrigerator.
General
Egg Dying Hints
Covering your
work area with plenty of newspaper or other paper makes
clean up afterward a snap -- just gather up the mess and
throw it out in one fell swoop
An empty egg
carton makes a good drying rack (see photo), but liquid
tends to collect at the bottom so use caution when lifting
eggs out of the drying rach and blot the bottoms carefully
with a dry paper towel so the color doesn't run
Making sure
eggs are completely dry between color coats is probably the
one most important tip for great Easter eggs - absorbent
paper towels, used to carefully blot the eggs, can help
finish the process
Wearing rubber
gloves will help your fingers avoid getting stained with
food coloring -- and they will regardless of how careful you
are
If you don't
want to color boiled eggs, you can also use hollow egg
shells in which the contents have been "blown"
out.
Crepe Paper Dye
Different color crepe paper
hot water
small bowls or cups
slotted spoon
cooking oil
soft cloth
Soak crepe paper in hot water in individual bowls or cups for each color. Add
eggs and allow to sit in water until he desired color is achieved. Remove with
slotted spoon and allow to dry. Polish with small amount of cooking oil and soft
cloth.
Food Coloring Dye
Food coloring
hot water
white vinegar
small bowls or cups
slotted spoon
cooking oil
soft cloth
For each color measure 1/4 tsp. food coloring in small bowl. Add 3/4 cup hot
water and 1 tbsp. white vinegar to each color. Add eggs and allow to sit until
they are the desired color. Remove with slotted spoon. Polish dry eggs with
small amount of cooking oil and soft cloth.
Spotted or Stripped Eggs
Spotted Eggs: Put about 2 tsp. of cooking oil (Canola works well) in your dy.
(You might want to make two containers of your dye, so you don't mess up all of
your regular dye.) When you dip in your egg, it makes the dye not stick to the
places where the oil is, thus making mysterious spots on your egg and aweing
your friends!
Stripped Eggs: Wrapping electric tape around an egg won't
make a clear stripe, but it can make a really cool design! Take one or two
pieces and wrap them around or stick them in various places. Then dye your egg.
The dye will seem in along the edges of the tape and make great patterns.
Marble Eggs
Large glass jar
Crayon stubs
Vegetable grater
Hot water
Waxed paper or newspaper
Empty egg carton
Clear acrylic spray (optional)
Grate peeled crayons over waxed paper. Fill jar with very hot water. Drop bits
of grated crayon into water. Add hard boiled or blown egg as soon as crayon
begins to melt. Twirl egg in water with spoon. the wax should make a design on
the egg. Carefully remove egg and set upside-down in egg carton to dry. Once dry
spray with clear acrylic to seal.
Dinosaur
Eggs
Hard
boiled eggs
6" square of cheesecloth for each egg
Rubber bands or twist ties
Small paint brushes or cotton swabs
Basic egg dyes in desired shades
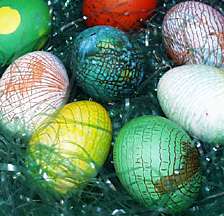
Wrap
a piece of cheesecloth tightly around a dry egg, bundling the
edges together and fastening them at the top with a rubber band
or twist ties. Dip your paint brush or cotton swab and dip it
into the egg dye, then dab this onto the cloth covered eggs.
Repeat, painting the eggs with various shades in various places,
use your imgaination. Overlap some colors for special effects,
or keep it monchrome. When you're finished painting, set the egg
aside to dry.
The
more patient you are and the more the egg dries, the better.
When you unwrap the egg, you'll be left with a design that
resembles armadillo skin. You can use this technique over plain
white eggs, over a base base coat of color or even over marble
colored eggs.
Another
technique, which will give a subtle textured effect to a solid
colored egg is to wrap the egg in cheesecloth, as per the
instructions above, then dip the whole thing in the cup of egg
dye. Let it sit until done to desired shade. Let dry (it doesn't
have to be bone dry, but the drier the better) before carefully
removing cheesecloth.
Sponge Painted Eggs
Liquid tempra paint
paper cups (for each color)
small pieces of foam or sponge
clothes pins (for each color)
egg cups
clear acrylic spray
Place hard boiled or blown eggs in egg cups. Partially fill paper cups with
different colors of paint. Clip a piece of sponge to a clothes pin and dip into
paper cups, use the clothes pin as a handle. Lightly dab the sponge over the top
half of the egg. Let dry. Turn egg over and repeat procedure. Let the egg dry
completely. If using blown eggs, spray with acrylic spray for a permanent
finish.
Waxed Eggs
Wax crayons
paper towels
egg dyes in different colors
slotted spoon
cooking oil
soft cloth
Draw a heavy crayon pattern on hard boiled egg. Dip egg in egg dye, preferably a
dark color. Leave in dye until desired color is reached. Remove with slotted
spoon and place in 200 degree F oven for a few minutes until wax is melted. Wipe
with paper towel and dip again in lighter dye to fill in pattern where wax was.
Polish finished eggs with cooking oil and soft cloth.
Etched
Designs
Here
is a good method to use if you want to make a design made up of
fine lines. Because it requires the use of melted paraffin wax,
be sure you get help from an adult. No kidding. You could end up
badly burned or.... a burn down house!
Before
you melt your wax, be sure an adult is nearby to supervise.
Always melt your wax very slowly in a double boiler. Never,
ever, ever melt wax over direct heat. Do not try to melt wax in
a microwave oven. The only safe way to melt wax is over water
very slowly and never taking your eyes off it. As soon as it is
melted, remove it from the heat.
First
dye your egg any color you wish. This will be your background color.
After it is dry, dip it into melted paraffin wax. After the wax is
dry, etch your design by scratching through the wax with a darning
needle. Then dip the egg into another color of dye. Because of the
wax coating, only the lines you scratched will pick up the new
color. Remove the wax by heating the egg slightly in hot water, and
polish the surface by rubbing in any remaining wax.